Smoker building tutorial, DIY smoker (Octasmoker)
You want to build your own Smoker? You'll learn about we thought are important features, why we built what we've built, how we built it (including the required tools and material) and what we probably would do different the next time. This was probably the most fun project we ever built: Not only cause we had a great time, but also because building a smoker is rewarding (you get smoked meats after all) and it's a "forgiving" build (you can just weld stuff together and the probability it servers it's purpose is veeery high).
Intro
I've been a fan of meat prepartion on grills for a long time (link to other post). We also tried smoking on a conventional Weber Grill once, the result was great, but I remember the process to be cumbersome. Holding a steady temperature for multiple hours with the very thin walls and the fact that adding coal requires the disassembly of the grill was not a nice experience. A friend of mine, Lukas, raised the topic to our consciousness again. Personally, spending several weeks in Texas last year and enjoying a lot of BBQ, I was very open to the idea of replacing our cancelled vacation (thanks to Corona) with some time together in the garage and building a smoker. So here we are: You are very welcome to use the construction plans on this page for free, also for commercial projects. Maybe you want to show your appreciation by sharing and liking! :)
Let's dive right in!
Terms used throughout this post / Glossary
To make sure, we're talking about the same thing, here's a list of words I'll be using constantly and their explanation.
- Firebox: In our case the "right" side of the smoker where the fire will be.
- Smoke chamber: The bigger (main) part of the smoker. This is where the meats will go.
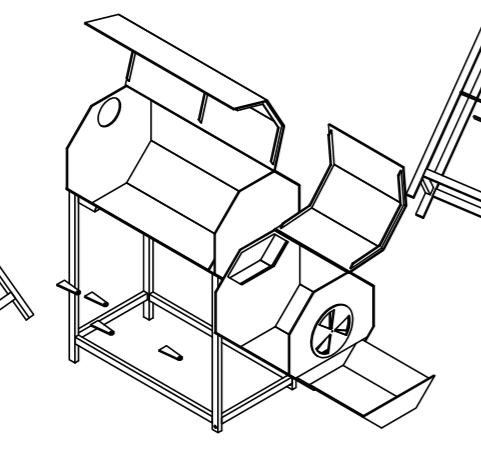
- Octaplate: One of the eight plates covering the sides of the smoker.
Design Guidelines
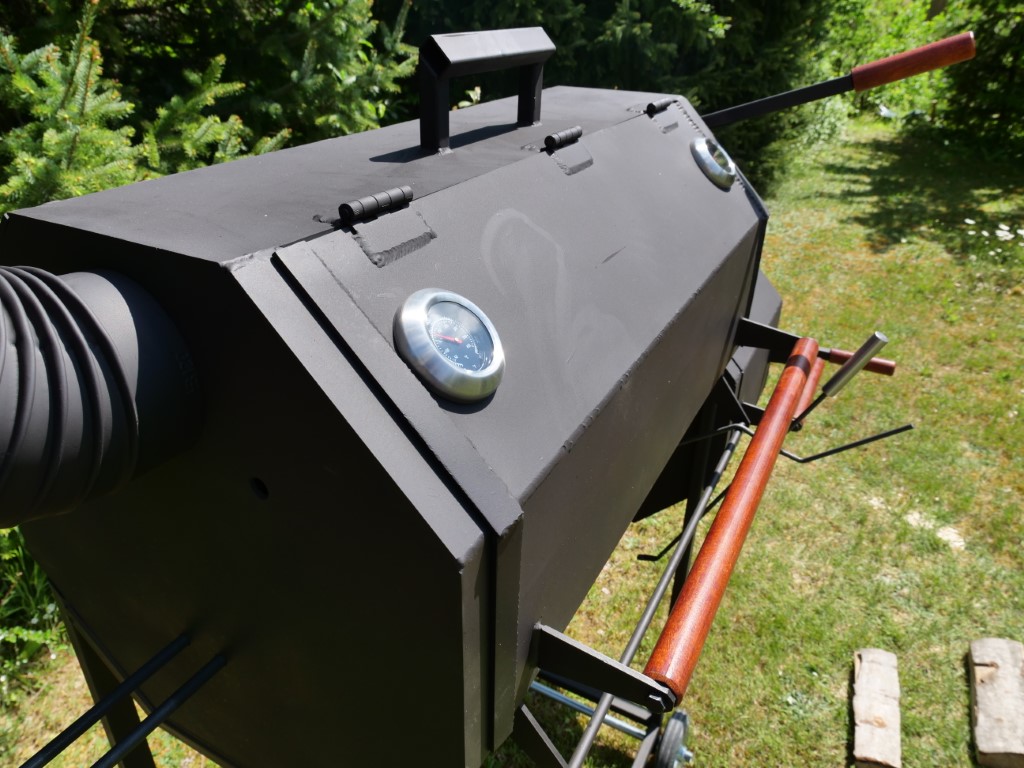
- Hole with thread in the smoke chamber to allow temperature sensor pass through. (M14)
- Smokestack better too high than too low. You can always restrict airflow in the smokestack with a throttle valve
- "The rule of thirds" the firebox should be half the size (or a third of the total size) of the smoke chamber. This rule is not applicable for really big smokers (length of 2m and more). Here, the firebox can be smaller.
- Airflow holes should match in terms of area
- Removable ash tray
- Flaps should be as tight as possible
- Use at least 5mm steel for better insulation. If you go for thicker walls make sure to calculate the total weight you are going to end up with.
- Build a solid frame - this thing is going to be heavy. Include wheels in your frame.
- Smoke should enter main chamber below meat (use the "rule of thirds" - upper end of the hole should be at least a third of the diameter).
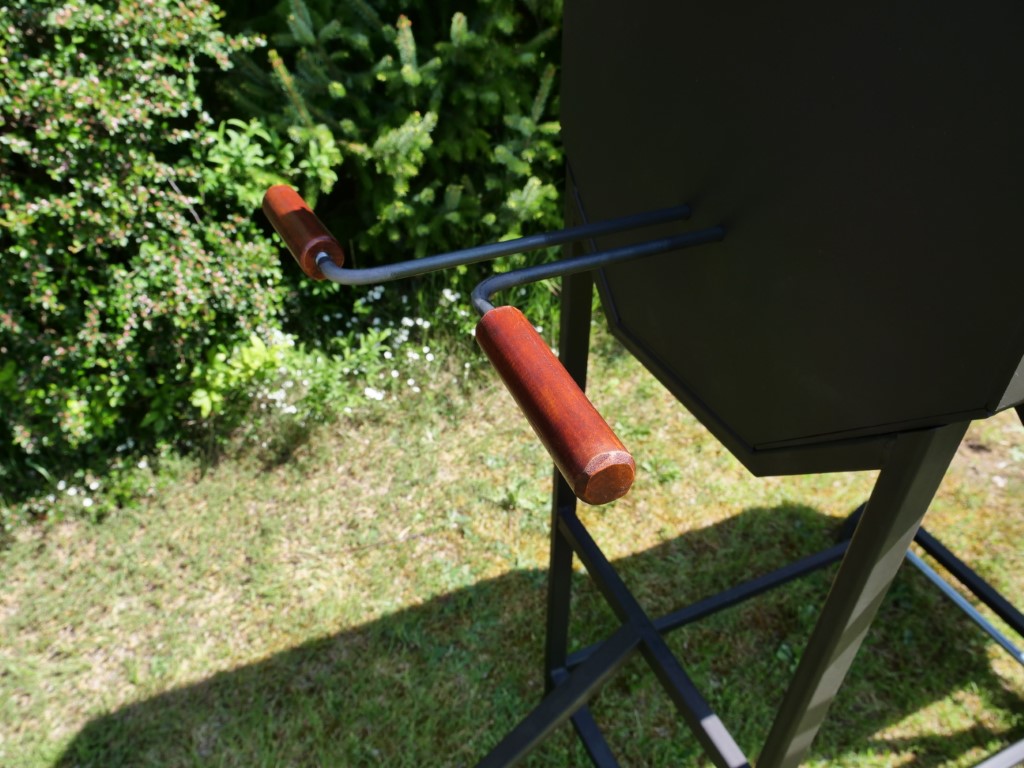
- Grips should be made of wood or something that does not burn your hands.
- The reason, we went for the octa-design was that a steel pipe with a large (45cm) was so expensive that ordering laser cut steel parts was actually cheaper. And we didn't think of other stuff that could be recycled (Bath tubs, gas pressure tanks, etc.).
Get the latest construction plans here! or click the image.
Tools required
- A welder. I used a TIG welder since I a) love the art of welding and b) I already had one. If you don't have one, I'd definetely get a MIG / MAG welder for this project. You will lay a lot of seams, and MAG is way easier to handle if you don't have any previous experiences. With MAG the feeding rod is coming out of the nozzle and does not require manual fiddeling. And probably another advice: Get the cheapest one and figure things out before you invest heavily.
- Welding clamps. I have a fixed angle magnetic one (45° and 90°) as well as a configurable one (going from 0 to 120° I believe)
- A saw to (mainly) saw the profiles for the frame. A hand saw (20€) will do, but that will be laboursome. I had a lot of steel sawing projects coming up, so I went fo a cheap (300€) metal band saw. It required some setup (like 2h) but not it's cutting almost perfect angles in every direction - precise to 0.5°.
- Drilling machine. It's a lot easier to drill through steel if you have a column drill, and you'll loose way less drills in process if your drilling machine sends unidirectional force. BUT: a drilling machine is also an expensive piece of equipment. And: you don't have to drill a terrbile lot of holes, especially if your lasercut steel already has the holes.
- Drills and thread cutters
- A metal grinder for removing the crust on the steel bars (yields nicer seams) as well as removing unnecessary material that's in the way and cutting steel. We used two different plates: A dedicated grinding one and a cutting one.
Material required
- Laser or plasma cnc cut parts. If you're interested, you can sign up at the waiting list and I'll let you know when we place the next batch order. Cost excluding Shipping is 500€.
- 20x30x2mm rectagle steel tubing for building the frame. We used approximately TODO meters.
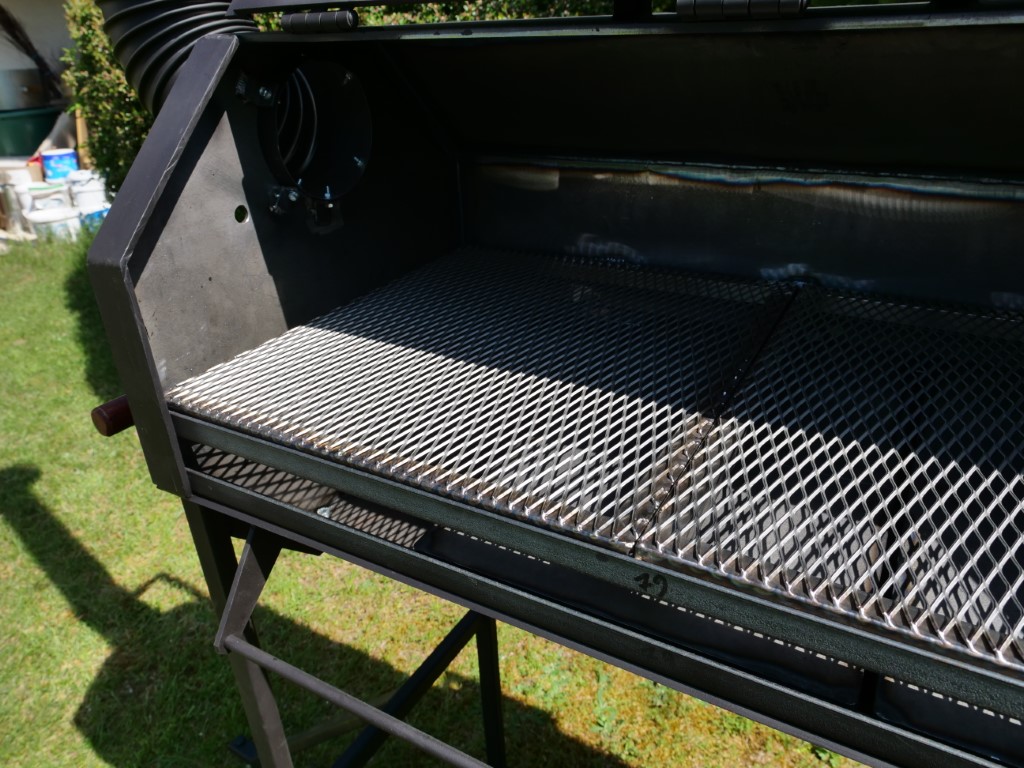
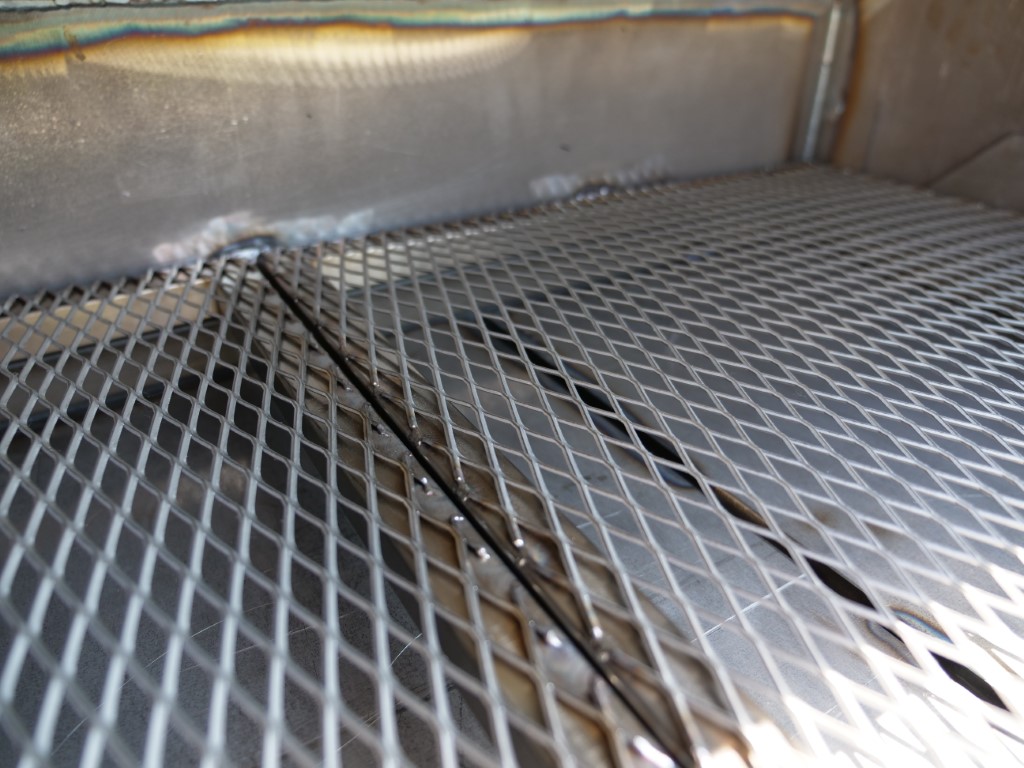
- 15x15x1.5mm high grade steel for building the BBQ grill
- 2x woven high grade steel mesh (or whatever that's called) for the BBQ grill. Dimensions: 380mm x 435mm. Be sure to divide it in two parts to make the insertion into the smoker easier.
- Thermometer, BBQ god Aaron Franklin recommends the "Tel-Tru BQ 300". Just go ahead and get this one.
- Spraypaint that withstands high temperatures (800°C)
- Two wheels that can deal with 300kg in total.
- An axle for the wheels.
- Something to fix the wheels in place (we used a split pin).
- A bunch of screws: For fixing the smoker to the frame we used M8. You will also need screws for fixing the smokestack to the smoke chamber and if you go with wood for your handles,
- Hinges, you probably want to get weldable ones. Be carefull: This has to be the same material as the part of your smoker where you want to weld it to - whis is most likely regular steel.
- Sand paper
All in all, we spent about five days building the Smoker (8am - 9pm) and approximately 1200€.


The Build
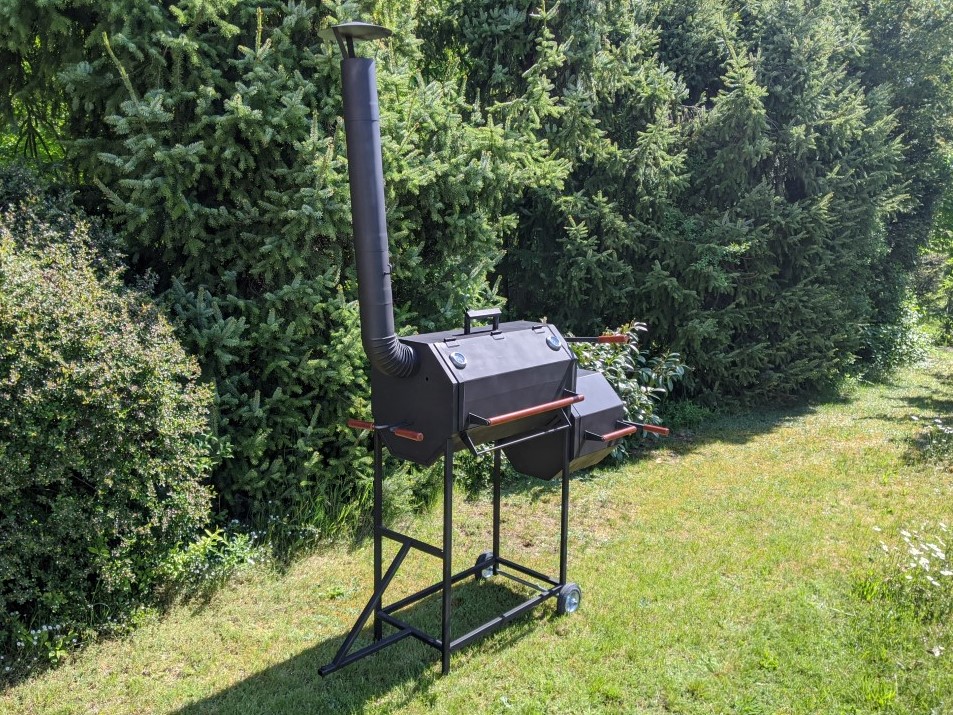
Our build was performed in three steps: The frame for the smoke chamber, the heat box and the smoke chamber itself. You probably want to follow the same execution plan for a simple reason: You gain precious knowledge about what can go wrong when building the firebox. This knowledge is applyable on the smoke chamber.
The Frame
We started with the frame since the lasercut parts were delayed and the CAD was actually done while Lukas und Kevin were at the home improvement store.
The construction itself is as simple as possible and only serves a few purposes:
- Holding the Smoker
- Offering a trailer hitch to be connected to our sit on lawnmower.
- Wheels on one side
- No wheels on the other (to avoid rolling away when put down)
We may add another level to the frame to place some stuff on. But for now, we didn't.

Not much to say about the build itself: Just cut the dimensions on the construction plan and weld them together. Honestly, I did not complete all seams. Picture how force flows through the frame and you may save yourself some time by not welding all seams. The probably only advice is that you pay great attention to getting your angles right.

You might want to adjust the height in which the hole for the wheel resides according to your wheel size: The height of the hole's center point (measured from the floor) should be equal to half of your wheels diameter.


Firebox
While all welding seams are easily accessible when building the frame, things are different in the firebox. The welding order should be thoroughly planned, since welding seams turn out the nicer if they are accessible.
Order:
- Welding three plates to both walls (bottom front, bottom, bottom back)
- Sawing the 3 plates of the lid into a small part (40mm) and the actual lid. The small part will make space to operate the throttle flap bar to main chamber.
- Welding 3 flat steels to the small parts to allow the lid to rest on.
- Welding 2 more plates to the heatbox (rear and rear top)
- Welding a flat steel to the rear top plate to support the lid.
- Welding the lid (see below)
- Dotting and welding the hinges

- Welding the holders for the grip
- Welding the lid stop to the rear-top octaplate.
Building the lid was a little bit strange: We placed the 3 rectancle laser cut steel plates on the firebox and welded them after making sure they fit perfectly on the outside. After cooling down the angles turned out a little bit to small. So we added the inner element to stiffen the construction and fixing the (correct) angles - see picture below. Which made things even worse.

But this made things even worse. Final result had approximately 1-4mm gap, we were not super happy with that. No idea what went wrong. We decided to do things differently with the smoke chamber: Dotting the supporting angles first, dotting the plates, welding the angles and than welding the plates.


The ashtray
After the firebox was built, I placed all sides of the ashtray inside the firebox and tacced everything togethered in place. After that, I removed the ash tray drawer and welded it outside. Like all other parts, the ashtray is made of 5mm steel. Since it's purpose is mainly to hold ash (that weights almost nothing) this part is - given it's 5mm thickness - the most over-engineered one. If you want to save weight and cost, feel free to go with 2mm steel for the ash tray.


The result was surprisingly flush:

Smoke chamber
The smoke chamber is the biggest and heaviest part of the build.
Before welding stuff together, be sure to drill all holes that are required later. In on our case for the smokestack side:
- The hole for the smokestack was already there (lasercut)
- Two 10mm holes for round steel that will be later attached to the tuning plates (to move them wihout opening the smoke chamber lid)
- One 14mm hole for feeding a wire for a temperature sensor through.
For the firebox side (aside from the main pass through for heat from the firebox) we only drilled one 10mm hole at the top for actuating the flap between firebox and smoke chamber.
We also drilled a M12 hole into the floor octa plate right next to the firebox. Here, a grease drain will be installed. If you do the math and cook a 12lb brisket that is going to loose 30% of its water during the cook, you will end up with 4lb of grease. So I'd definetely recommend installing one. Also, it makes cleaning a lot easier.
Ready to weld?
Since the frame was already built, I welded the lower three octaplates to the front- and endface of the chamber while everything way laying in the frame. The idea was to ease the latter wedding of both parts. I did not use additional feeding rod for seams on the inside. The reasons for this were two-fold: First, if welded without feeding rod, you will not get any "welding flakes". Since there will be grease and dirt in the smokechamber, this makes cleaning easier. Second, it saves feeding rod.

Now that we have a construction that is already surprisingly rigid and we can add more "lightweight" parts: Angles for fixing the smokestack later on and the mechanics for moving the flap between firebox and smoke chamber. Our mechanics for the latter one sucked (see TODO link to improvements) - and there will be definetely an improvement. Here are two pictures that explain the ideas:


The flap (or better: its mechanics) is one of the few things that I would do differently next time. Main reason: It's stuck almost at all times. The screw on the left side is used for "fixing" the flap. Our hope was to be able to set the point where the flap holds its position (be it up, down, or somewhere in the middle) while still going easy when being actuated by the lever located on the outside.

After that, I added / welded the rear octaplate. Easy.
Nextup were the L-shaped steels in two levels: The lower level is suposed to serve as "slide" for the tuning plates. The upper one will cary the BBQ grill where the meat will be placed on. I did not excessively place seams. The rear ones were welded using three 5cm long seams to the rear octaplate and a tiny seam to the side. The front ones were welded to the faces along the vertical part of the L. The seam was grinded afterwards to allow a better fit (higher tighness) of the lid that will be installed later.
No take a look at the smoke chamber: Last time it's easily accessible before accessibility and sight will be reduced.
No it's time to add / weld the rear top and top plate. Straightforward. We had a discussion if our lid should be three (front, front-top, top) or just two (front, front-top) octaplates. We went for two, since this already yields a large enough opening and a smaller lid is causing less leakage (cause the lid will not be 100% smoke tight).
For building the lid, we used a different technique than for the firebox inspired by other (round) smoker builds. Basic idea is to
- Cut the front octaplate using an angle grinder on the sides (we left 50mm space on each side). At this point you only want to cut the octaplate where the L shaped steel (for the tuning plates) will be afterwards.
- Weld the front and front-top octaplates to the smoke chamber. Do not weld the horizontal seams. Only weld the "vertical" seams on the outside.
- Weld the the hinges onto the "lid" (whis is technically not yet a lid).
- Use an angle grinder to cut out the rest of lid.
.jpg "Step 4: Using an angle grinder to cut out the lid")
After that, we used a (sledge) hammer and a piece of wood to hammer against the hinges and the lid to make the fit as perfect as possible. We spend about an hour and got the gap between lid and smoke chamber down to about 1-2mm. Don't go too crazy on this optimization, when your smoker is going to heat up, steel is going to expand and what happens is not easy to predict.
After the lid is cut out (and movable for the first time, yeah!) there will still be the gap caused by cutting with an angle grinder. We used 4 pieces of 4mm thick, 24mm wide flat steel and welded that to the outside of the (overlapping with the lid 8mm). I advise to resist the urge of welding the flat steel "straight" (lying flat on the lid) to look nice at the expense of a perfect fit. I even bended the flat steel to make the fit as perfect as possible (which paid of, the lid turned out to close satisfyingly snug with almost no visible smoke leakage).
After that, only two steps are left: Welding the steel for holding the handelbar, welding the steel for holding the rod to store BBQ equipment and the door stop to hold the lid in a 45 degree angle when open.


To make sure the holding rot and the and the handlebar are aligned, we used a clamps and a flat steel part we had in spare:

Lid stop
Pretty much the last thing we built before the marriage was welding to lid stops to both, the firebox and the smoke chamber. The purpose is to avoid the lid "falling over" behind and being unreachable afterwards. We used a very simple construction: One horizontal 30x20mm and two vertical 30x20mm. Be sure to orient the vertical ones in a way that the horizontal one is able to overlap the whole hole (caused by the 45° angle). The vertical ones always had a 45° at the top. In case of the smoke chamber, the other end had a 90° angle (since the lid only consists of two octaplates). The stops for the firebox, however, had 45° at both ends. The reason for this is that sit on the rear-top octaplate (for the smoke chamber it's the top octaplate).
")
, detail")

The smoke chamber looked like this:

If you use a different construction be sure that the center of mass of your lid is behind the tipping point. In other words: The lid should always fall towards your lid stop - not back at you.
The wedding(s)

Having an automotive background, I was reminded of the (automotive) wedding. The latter refers the production step, where the drivetrain is attached (wedded) to the body of the car. During the smoker build, I felt like a wedding is happening twice:
- When the firebox was wedded to the smoke chamber.
- When the resulting part of the latter step was wedded to the frame.


Both are pretty satisfying and straightforward steps, there's just one thing to think of: After wedding 1 your (combined) part will be heavy af. Before, the parts (heatbox could be carried by one, smoke chamber required two) were manually handable. After that you'll require something to move it comfortably. For the second wedding we were lucky to have a hook in the roof where we attached a chain crane.

Paint job
Since we worked with regular steel we need to paint our smoker to prevent it from rusting. Be sure to
- Only spraypaint the outside (the smoke will do the inside for you) - and you certainly do not want solvent taste in your meat.
- Be sure to use spraypaint that's rated for high temperatures (the one we've used was rated for 800°C)
- Apply several layers to increase the probability that you actually covered every spot and angle.
- Paint each part individually (smokestack, ashtray, etc.) to ease later disassembly.
And last but not least:
- Be safe and wear a Gasmask and googles to protect your longue and eyes!


Cooking grate
The cooking grate was welded the last night we were working on the smoker. This is the only part that was made of stainless steel. The idea was to have two, equally sized cooking grates (cause a single, large grate would not fit through the smokechambers opening).
The foundation for each grate are 4 stainless steel rectangle tubes (20x20x1.5mm), cut to a 45° angle on each side. After welding them together (be care to use stainless steel filler rod!) and grinding them, I tacced the triangle shaped metal onto it. A quite cumbersome task to be honest. But welding every single one has the advantage that you don't have any sharp edges left.

I did not include the dimensions in my construction plan on purpose: Up to this point, you may have use different L-Profiles or other shapes than me. Just go ahead and measure how much room you have for you grate (and be sure to use all of that real estate). The long side of your stainless steel profile is equal to the space you have in depth (or half of the width). The angles lean towards each other.

Woodwork
For handlebars and anywhere you want to be able to "do" something with your smoker while in operation you'll want to use a material that does not transmit heat (or has enough spacing to cool down by convection). We went with wood: Nicer touch and look - in our humble opinion.
The wooden parts are all made of beech wood. That's what we have in europe: As hard as oak, but with less texture. We used "mahagoni" coating to make it darker. Each part was treated 3-4 times by sanding and staining. Lukas pre-drilled all holes to avoid that the woods cracks upon final assembly when the bolt is inserted.
Results looked like this:


We used the parts for multiple places: The handlebars for smoke and main chamber, a handlebar for opening the ash tray, a handlebar for the flap between smoke chamber and firebox, a handlebar for allowing airflow into the firebox (the nuke symbol) and one for each of our two heatplates. The last one (for the smokestack) is still a TODO - we forgot that one.
Welding Basics
Disclaimer: I'm not an expert, just a hobby enthusiast. So handle this advice with care. General process is:
- Clamp everything tight together.
- Check & correct fits (e.g. using a hammer)
- Place a dot ("dotting")
- Check & correct fits again
- Weld the seam
You probably don't want to add filler rod all the time. I usually only use it when necessary. Necessary in this case is that the two edges I want to well are to far apart to meld together without filling rod.
Regarding amperage: My rule of thumb is 40 amps for each mm of steel (which gives some more time to do the seam). My TIG welder maxes out at 170A - which is what is used for our 5mm plates. I welded them from both sides however.
Initial operation
Before First use, burn it out. Which means: The biggest fire you can get for at least an hour. Wipe away all unwanted remainders. After that, rub it in vegetable oil - if the latter sounds messy to you: Agreed. We also skipped that step. You may also repeat this process after not using the smoker for a long time.
Optimization Potential
This section summarizes some of the "AhAh"-moments we had, sadly after building the smoker and using it or studying great literature (amazon link manifesto).
- bigger wheels: Although our wheels are rated for 150kg each (which is enough) it is cumbersome to move the smoker on non flat surfaces such as grass.
- position the smokestack lower (height of the meat) to allow the smoke to stroke the meat thoroughly.
- I know, we have tuning plates. But a heat buffer plate, forcing the heat to go the downward direction after exiting the heatbox may benefit an even temperature.
- isolating the heatbox to allow for operation in cold(er) weather conditions.
- Install the handle for opening the smoke chamber in an declining angle to make it easier reachable when the lid is open.
- The mechanism for the flap between firebox and and smokchamber does not go smoothly. We will revisit this part of our contstruction. Either bei using a chain drive (downside is, that it can only pull upwards and not push downwards or built something with gears).
Pictures of the final result

The end
If you stuck with me until here: Thanks so much for reading. This post served it's purpose if you feel inspired to come up with your own design or if you feel confident enough to follow this (or any other) smoker build tutorial and start your build. If I forgot something important or I there are any questions left (which I am sure there are), I appreciate every single comment! If you want your build to be shared on this page, just drop me an email with an image and any additional information that you want me include.
Happy smoking, Bernhard.
PS: If you need a recipe, a well researched yet compactly presented brisket recipe is available here.
THEME_QUARK.BLOG.ITEM.PREV_POST THEME_QUARK.BLOG.ITEM.NEXT_POST